
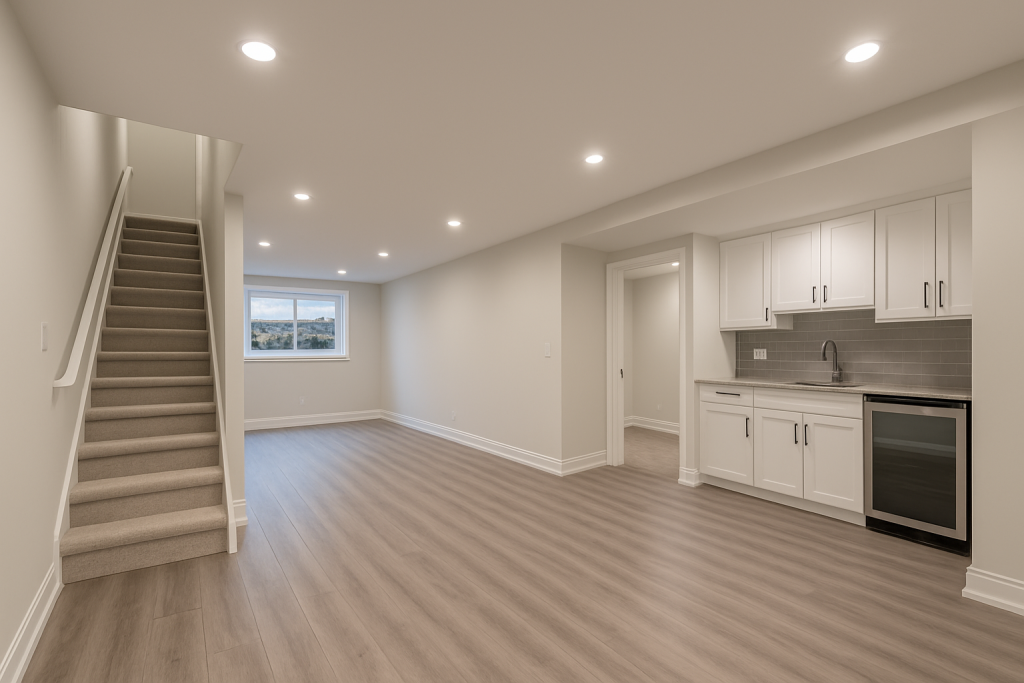
Finishing your basement is one of the most impactful ways to increase living space, boost home value, and enhance everyday comfort. Whether you’re creating a cozy family room, a rental suite, or a home gym, a well-planned basement renovation can transform your unused lower level into a functional, beautiful part of your home.
In this guide, we’ll walk you through everything you need to know about basement finishing—from early planning to the moment you move in.
Why Finish Your Basement?
An unfinished basement is often an underutilized area with immense potential. By finishing your basement, you can:
- Increase Living Space: Add bedrooms, bathrooms, or recreational areas.
- Boost Home Value: A finished basement is a strong selling point for buyers.
- Create Versatility: Design spaces like a home office, gym, or entertainment zone.
- Improve Energy Efficiency: Proper insulation and sealing can reduce heating and cooling costs.
Step 1: Evaluate Your Basement
Before you start designing your dream space, you need to assess your basement’s current condition.
Check for Moisture Issues
Basements are prone to dampness. Look for:
- Water stains on walls or floors
- Musty odors
- Cracks in the foundation
If moisture problems exist, address them before moving forward. Solutions might include sealing cracks, installing a sump pump, or improving drainage.
Assess Ceiling Height
Building codes often require a minimum ceiling height for finished spaces (usually around 7 feet). If your ceiling is too low, lowering the floor or raising the ceiling may be necessary. This can be a complex and costly process, so it’s important to evaluate whether the investment aligns with your renovation goals. In some cases, creative design solutions—such as using low-profile lighting or exposing beams—can help create the illusion of more height. Consulting a professional contractor ensures that any structural changes are safe, compliant, and visually appealing.
Step 2: Define Your Goals
Think about how you want to use the space:
- Additional bedrooms or a guest suite
- Recreation or family room
- Home theater
- Rental apartment (check local zoning laws)
- Hobby room or home gym
Having a clear purpose will guide design decisions and ensure you meet both your needs and local building codes.
Step 3: Plan Your Layout
A successful basement finishing project starts with a smart layout.
Zoning Your Space
Divide your basement into zones for different functions. For example:
- Living Area: Open space for entertainment
- Kitchenette/Bar: For snacks and drinks
- Bathroom: Convenient for guests or tenants
- Storage: Keep seasonal items organized
Natural Light
Maximize natural light by adding egress windows or glass doors where possible. These features not only brighten the space but also improve ventilation and enhance safety. Natural light can make a basement feel larger, warmer, and more inviting—transforming it from a dark storage area into a vibrant living space. When planning window or door placement, consider both the exterior aesthetics and the interior layout to ensure harmony. Always check local building codes to confirm size and installation requirements, especially for egress windows.
Step 4: Understand Building Codes & Permits
Basement finishing often requires:
- Building permits
- Electrical permits
- Plumbing permits
Codes may dictate ceiling height, window size for bedrooms (for emergency escape), ventilation requirements, and more. Work with a licensed contractor who understands local regulations.
Step 5: Budgeting Your Basement Finishing Project
The cost of basement finishing varies widely depending on size, features, and materials.
Factors Affecting Cost
- Square Footage: Larger spaces cost more.
- Purpose: Adding a bathroom or kitchen significantly increases expenses.
- Materials: Luxury finishes raise the price.
- Labor: Hiring professionals ensures quality but impacts cost.
Pro Tip: Always include a contingency of 10–15% for unexpected expenses.
Step 6: Waterproofing & Insulation
Waterproofing is essential for a dry, comfortable basement.
- Install a vapor barrier on walls and floors.
- Use waterproof flooring options like vinyl, tile, or sealed concrete.
Insulation keeps the basement warm in winter and cool in summer. Spray foam or rigid foam boards are ideal for preventing moisture buildup.
Step 7: Electrical & Plumbing Planning
Decide on electrical and plumbing needs before framing walls:
- Outlets and lighting placement
- Plumbing for bathrooms or wet bars
- Wiring for entertainment systems
Hiring licensed electricians and plumbers ensures safety and compliance.
Step 8: Framing & Drywall
Framing creates the structure for walls and rooms. Use pressure-treated lumber for areas in contact with concrete to prevent rot.
Once framing is complete, hang drywall and prepare it for paint or finishing.
Step 9: Flooring Selection
Choose flooring designed for below-grade spaces:
- Luxury Vinyl Plank (LVP): Waterproof and stylish
- Tile: Durable and easy to clean
- Carpet Tiles: Add warmth and are easy to replace
- Engineered Hardwood: Suitable if moisture is under control
Step 10: Lighting & Ventilation
A basement can feel dark without the right lighting. Combine:
- Recessed lighting for general illumination
- Floor and table lamps for ambiance
- Natural light from windows or walkouts
Ventilation is equally important. Consider adding a heat recovery ventilator (HRV) for fresh air.
Step 11: Finishing Touches & Design
This is where your vision comes to life:
- Paint in light, warm tones to brighten the space
- Add built-in storage to maximize functionality
- Use area rugs to define zones and add comfort
- Decorate with personal touches to make it inviting
Step 12: Final Inspection & Move-In
Before moving in, schedule final inspections to ensure everything meets safety standards. Once approved, furnish and decorate your new space.
Common Basement Finishing Mistakes to Avoid
- Skipping waterproofing
- Ignoring building codes
- Using the wrong materials for below-grade conditions
- Not planning adequate lighting
- Overlooking storage solutions
Long-Term Maintenance Tips
- Check regularly for signs of moisture
- Keep gutters and downspouts clear to prevent leaks
- Maintain HVAC and ventilation systems
- Refresh paint and flooring as needed
Final Thoughts
A finished basement can dramatically improve your home’s functionality, comfort, and resale value. With careful planning, the right materials, and expert execution, you can transform an unused space into a vibrant, livable area that meets your family’s needs for years to come.
At domilya GROUP Inc., we specialize in high-quality basement finishing projects tailored to your vision. From the first consultation to move-in day, we handle every detail—ensuring your new space is beautiful, functional, and built to last. Contact us today to start planning your dream basement transformation.